자바스크립트(JavaScript) socket.io를 활용한 실시간 채팅창 구현
by 진혀쿠
부스트캠프 5주 프로젝트를 진행하며 사용중인 socket.io에 대해 정리를 해보고자 한다. 간단한 예제를 통해 사용법을 정리하는 것이 목표이다! 기초적인 것까지 설명하기 위해 노력할 것이다.
socket.io란?
위키백과에는 다음과 같이 정리가 되어 있다.
Socket.IO는 실시간 웹 애플리케이션을위한 JavaScript 라이브러리입니다.
웹 클라이언트와 서버간에 실시간 양방향 통신이 가능합니다.
브라우저에서 실행되는 클라이언트 측 라이브러리와 Node.js 용 서버 측 라이브러리의 두 부분으로 구성됩니다.
Javascript에서 WebSocket을 더 쉽게 사용할 수 있게 개발된 라이브러리라고 보면 될 것 같다.
환경 구축하기 👨🔧
express를 사용해 서버를 구축할 것이다. 나는 express generator를 활용할 것이다.
npm install express-generator -g
express --no-view
위의 명령어를 순서대로 입력하면 다음과 같은 파일들이 생성될 것이다.
설명을 좀 덧붙이자면 express-generator를 전역으로 설치한 뒤 view engine을 사용하지 않는 형태의 서버를 만들겠다는 의미이다.
설치를 했다면 다음 명령어를 순서대로 입력하자.
npm install
npm start
아래와 같은 화면이 나왔다면 성공!
그 후 아래 명령어를 통해 socket.io를 설치해주면 기본적인 환경설정이 끝난다.
npm install --save socket.io
HTML 파일 작성하기 📄
아래 코드를 참고해서 작성하도록 하자.
//public/index.html

<html>
    <head>
    <title>Express</title>
    <link rel="stylesheet" href="/stylesheets/style.css">
    </head>

    <body>
    <ul id="messages"></ul>
        <form action="" id="chat-form">
        <input id="m" autocomplete="off" /><button>Send</button>
        </form>
    </body>
</html>
//public/stylesheets/style.css

* { margin: 0; padding: 0; box-sizing: border-box; }
body {
  font: 13px Helvetica, Arial;
  background-color: #CEECF5;
}
form {
  background: #eee;
  padding: 3px;
  position:
  fixed;
  bottom: 0;
  width: 100%;
}
form input {
  border: 0;
  border-radius: 5px;
  padding: 10px;
  width: 90%;
  margin-right:
  0.5%;
}
form button {
  width: 9%;
  border-radius: 5px;
  background: #ffd600;
  border: none;
  padding: 10px;
}
#messages {
  list-style-type: none;
  margin: 0;
  padding: 0;
}
서버 코드 작성하기
이제 본격적으로 서버에 socket.io를 연결시켜줘야 한다. 우리는 Node.js의 HTTP Server에 socket을 연결시킬 것이다.
다음 코드를 참고하여 작성하도록 하자.
//bin/www

var app = require('../app');
var debug = require('debug')('socket-example:server');
var http = require('http');

var port = normalizePort(process.env.PORT || '3000');
app.set('port', port);

var server = http.createServer(app);
var io = require('socket.io')(server);

io.on('connection', (socket) => {
  console.log('a user connected');
});

server.listen(port);

...
코드를 보면 알 수 있듯이 http server를 통해 socket.io를 초기화 시킨 것을 알 수 있다. 그 후 통신이 잘 되는지 확인하기 위해 connection 이벤트가 발생했을 때 console.log를 찍는 코드를 추가해보았다.
클라이언트 코드 작성하기
서버쪽에서 연결을 위한 준비를 끝냈으니 클라이언트에서도 연결을 하기 위해 코드를 작성해줄 것이다.
public/javascripts 폴더에 socket.js라는 파일을 추가할 것이고 public/index.html을 수정해줄 것이다. 각각의 코드는 다음과 같다.
//public/index.html

<html>

<head>
  <title>Express</title>
  <link rel="stylesheet" href="/stylesheets/style.css">
  <script defer src="/socket.io/socket.io.js"></script>
  <script defer src="javascripts/socket.js"></script>
</head>

<body>
  <ul id="messages" id="chat-form"></ul>
    <form action="">
      <input id="m" autocomplete="off" /><button>Send</button>
    </form>
</body>

</html>
//public/javascripts/socket.js

const socket = io();
<script defer src="/socket.io/socket.io.js"></script>는 socket.io-client을 불러오는 코드이다. 이 코드를 통해 우리는 io를 global하게 사용할 수 있게 된다. 따라서 socket.js에서 io()를 통해 socket을 초기화 할 수 있는 것이다.
여기까지 작성한 후 서버를 다시 실행해보면 터미널에 a user connected가 뜨는 것을 확인할 수 있을 것이다. 클라이언트와 서버간 소켓이 연결됐다는 것을 알 수 있다!
채팅 기능 구현하기
소켓이 연결되었으니 본격적으로 채팅 기능을 구현해볼 것이다. 서버쪽과 클라이언트 쪽에서 필요한 이벤트를 emit/on 할 것이다. emit은 이벤트를 발생시키는 것이고 on은 발생한 이벤트를 받는 거라고 생각하면 된다. 서버, 클라이언트 코드를 수정해보자.
//bin/www

const app = require('../app');
const debug = require('debug')('socket-example:server');
const http = require('http');

const port = normalizePort(process.env.PORT || '3000');
app.set('port', port);

const server = http.createServer(app);
const io = require('socket.io')(server);

io.on('connection', (socket) => {
  socket.on('chat message', (message) => {
    io.emit('chat message', message);
  });
});

server.listen(port);
server.on('error', onError);
server.on('listening', onListening);

...
서버쪽에서는 chat message라는 이벤트를 클라이언트에게 받고 이를 다시 클라이언트에게 알려주는 코드가 추가되었다.
//public/javascripts/socket.js

const socket = io();

const chatForm = document.getElementById('chat-form');
const chatBox = document.getElementById('messages');

chatForm.addEventListener('submit', (e) => {
    e.preventDefault();
    const message = e.target.m.value
    socket.emit('chat message', message);
    e.target.m.value = '';
})

socket.on('chat message', (message) => {
    chatBox.appendChild(makeMessage(message));
})

const makeMessage = (message) => {
    const msgBox = document.createElement('div');
    msgBox.className = "message-wrapper";
    msgBox.innerText = message;
    return msgBox;
}
클라이언트쪽에서는 필요한 DOM에 접근하여 이벤트를 할당해주는 것이 주된 변경사항이다. chatForm에 이벤트 리스너를 등록하고 submit이 발생할 때마다 socket.emit('chat meesage', meessage)를 통해 서버에게 이벤트가 발생했음을 알린다.
또한 socket.on('chat message')를 통해 서버가 해당 이벤트를 emit했을 경우 설정해놓은 callback 함수를 동작시킨다. 여기서는 chatBox에 받은 message를 추가하는 함수가 실행될 것이다.
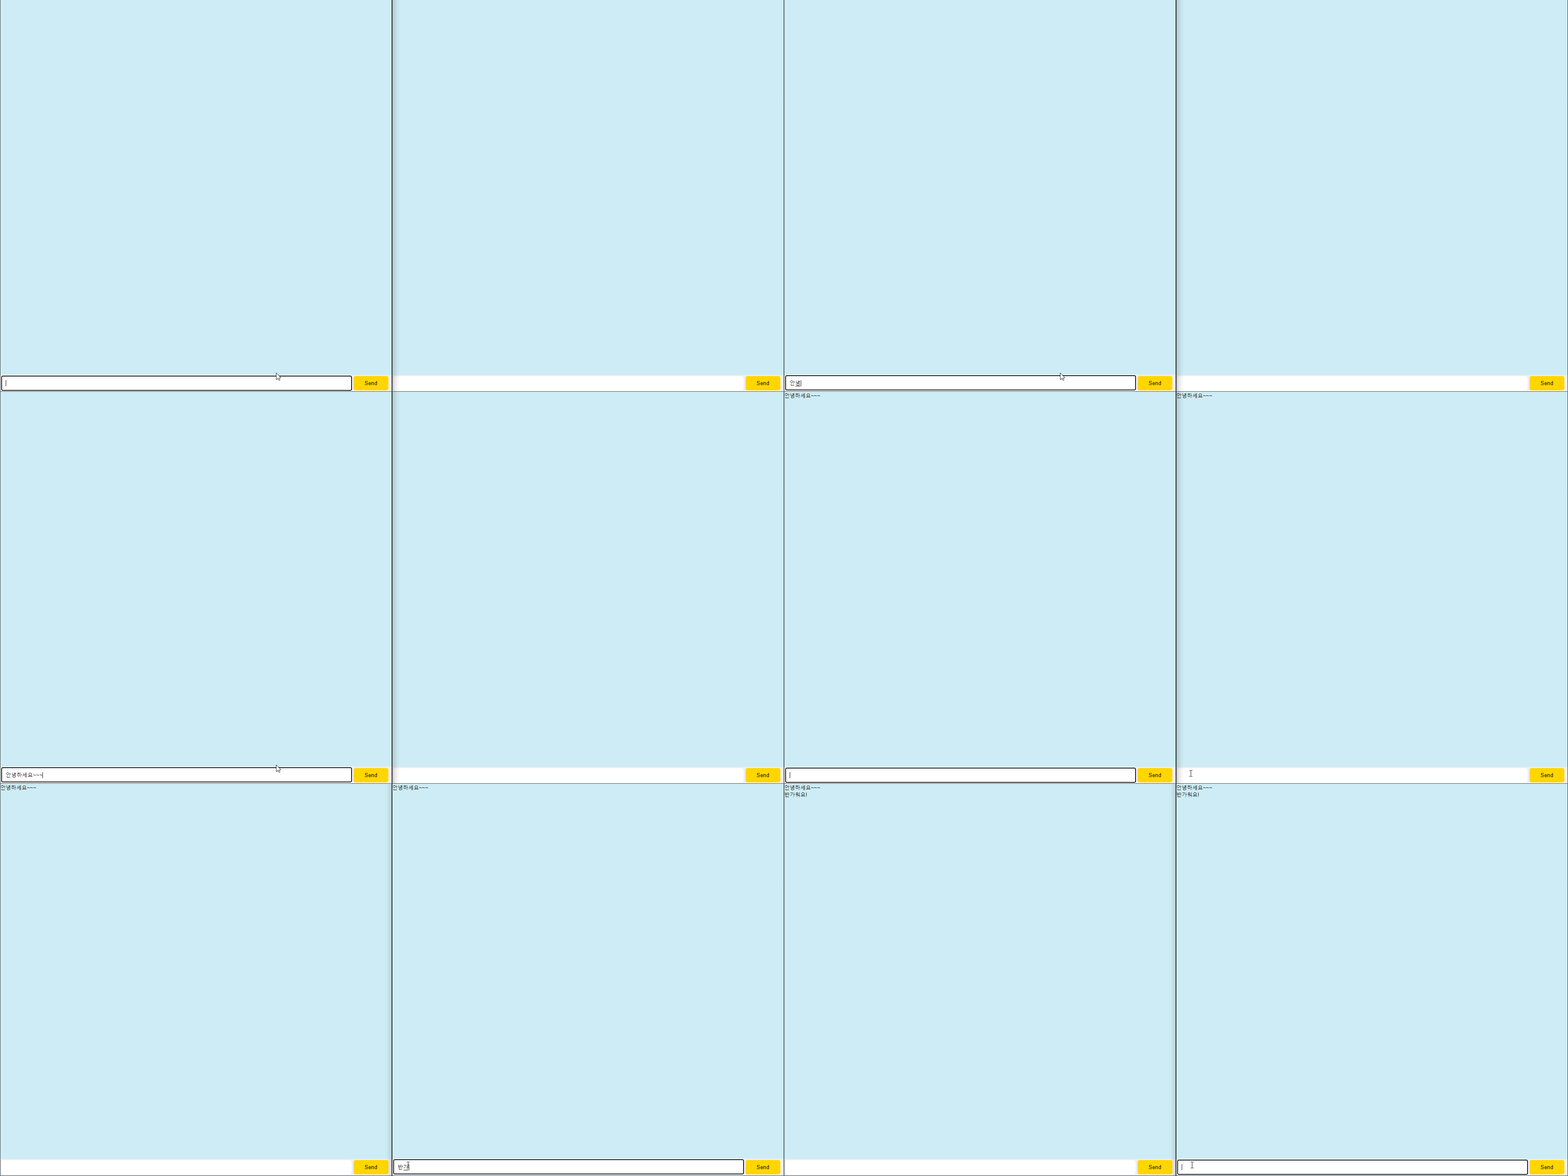
지금까지의 코드를 저장한 후 서버에서 동작 결과를 확인해보자. 채팅 기능이 잘 작동하는 것을 확인할 수 있다!

Broadcast 기능 및 css 적용시켜보기
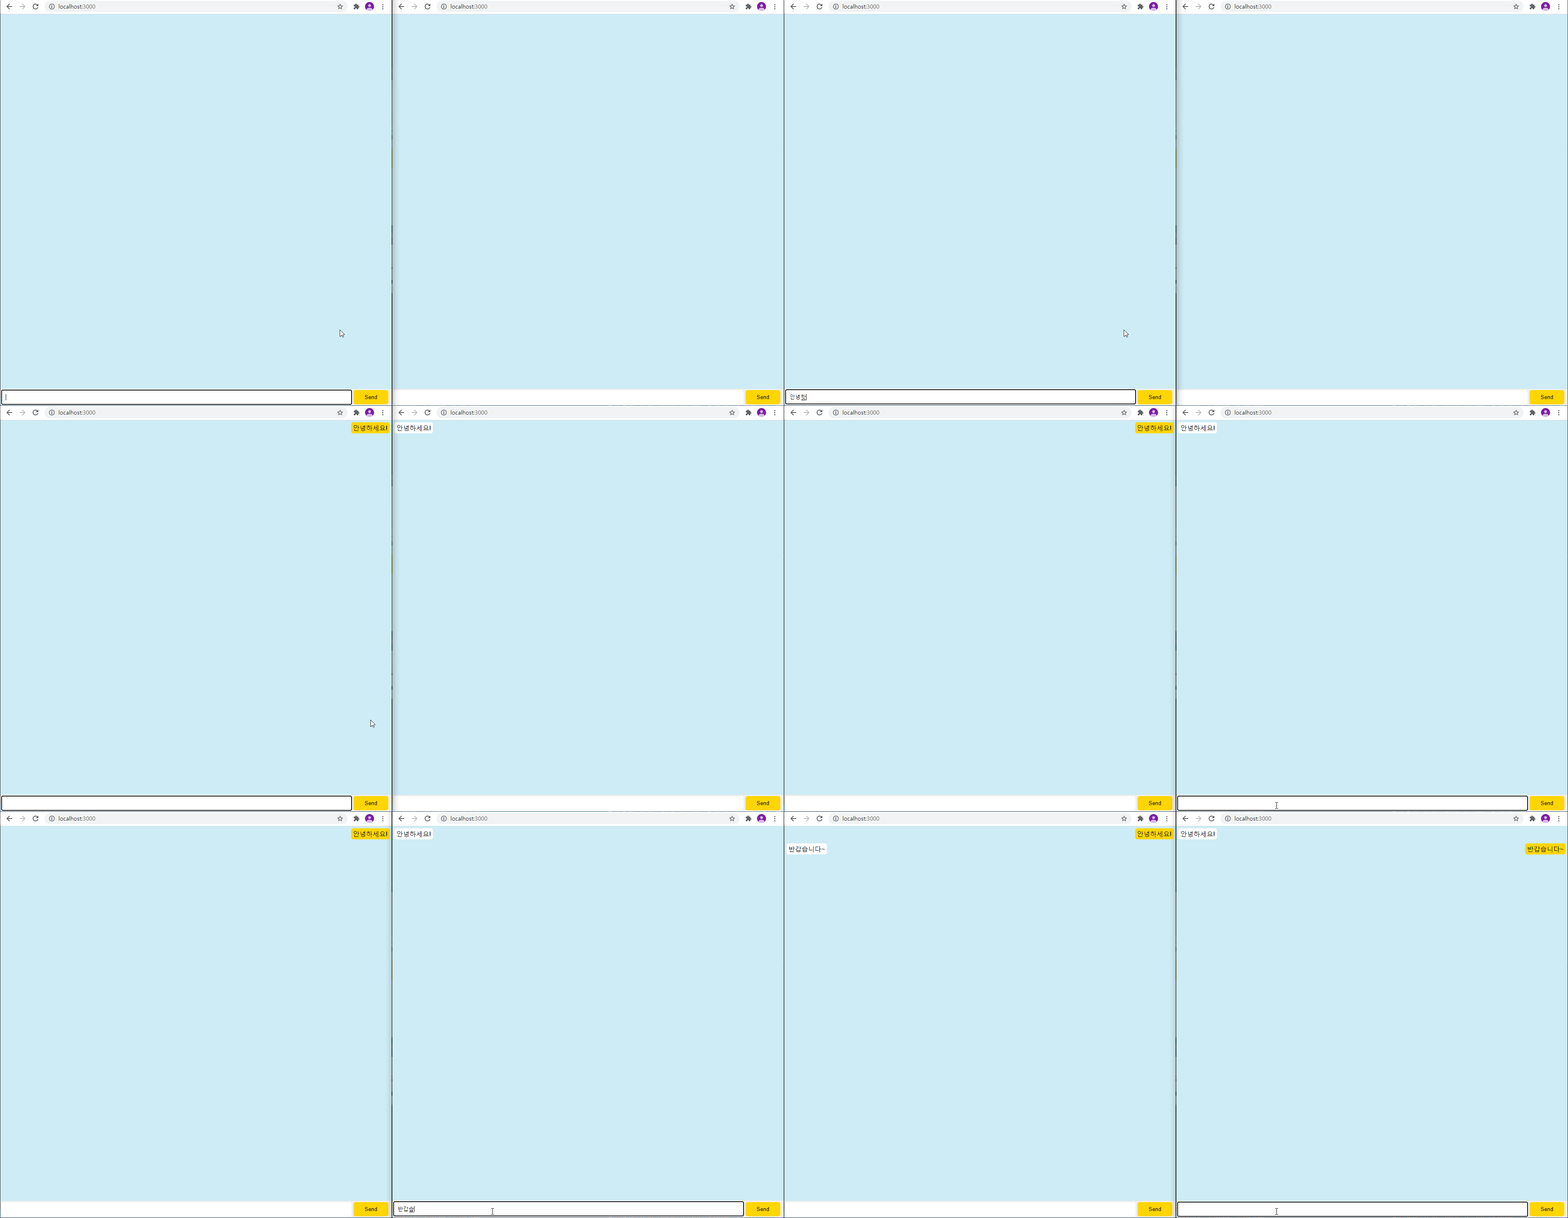
보통 채팅을 치면 나의 채팅과 다른 사람의 채팅이 다르게 보이는 경우가 많다. (예를 들면 카카오톡) broadcast를 활용하여 이를 구현해볼 것이다.
현재까지의 로직은 서버에서 연결된 모든 socket에 이벤트를 알리는 방식으로 되어 있다. broadcast를 사용하면 자신을 제외한 나머지 클라이언트에게 이벤트를 알리게 된다.
자신의 메세지는 클라이언트에서 바로 처리하게 하고 다른 사람의 메세지는 서버에서 받은 후 처리하는 방식을 통해 자신과 다른 사람의 메세지를 구분해볼 것이다.
각각의 파일을 수정해보자.
//public/javascripts/socket.js

const socket = io();

const chatForm = document.getElementById('chat-form');
const chatBox = document.getElementById('messages');

chatForm.addEventListener('submit', (e) => {
    e.preventDefault();
    const message = e.target.m.value
    socket.emit('chat message', message);
    e.target.m.value = '';
    // chatBox.appendChild(makeMessage(message, false));
})

socket.on('chat message', (message) => {
    chatBox.appendChild(makeMessage(message, true));
})

const makeMessage = (message, isOthers) => {
    const msgBox = document.createElement('div');
    const classname = isOthers ? "others-message-wrapper" : "my-message-wrapper";
    msgBox.className = classname;
    msgBox.innerText = message;
    return msgBox;
}
//bin/www

const app = require('../app');
const debug = require('debug')('socket-example:server');
const http = require('http');

const port = normalizePort(process.env.PORT || '3000');
app.set('port', port);

const server = http.createServer(app);
const io = require('socket.io')(server);

io.on('connection', (socket) => {
  socket.on('chat message', (message) => {
    socket.broadcast.emit('chat message', message);
  });
});

...
//public/stylesheets/style.css

...

#messages {
  display: flex;
  flex-direction: column;
  list-style-type: none;
  margin: 0;
  padding: 0;
}

.others-message-wrapper {
  max-width: 70%;
  align-items: flex-start;
  background-color: white;
  border-radius: 5px;
  padding: 3px 5px;
  margin: 5px auto 5px 5px;
}

.my-message-wrapper {
  max-width: 70%;
  align-items: flex-end;
  background-color: #ffd600;
  border-radius: 5px;
  padding: 3px 5px;
  margin: 5px 5px 5px auto;
}
클라이언트 쪽에서는 css 적용을 위해 각 상황에 맞는 className을 지정해주었으며 서버쪽에서는 기존에 io.emit이 socket.broadcast.emit으로 바뀐 것을 확인할 수 있다. 이 상태에서 동작을 확인해보면 나의 메세지는 채팅창에 추가가 되지 않고 다른 사람의 메세지만 채팅창에 추가가 되는 것을 확인할 수 있다. socket.js 파일의 주석을 해제하고 실행을 해보면 원하는대로 잘 동작하는 것을 확인할 수 있다!

socket.io를 활용한 채팅방을 구현해보았다. 다음 포스팅에서는 room 기능을 활용한 분리된 채팅방을 구현하는 방법을 적어볼까 한다. (시간이 허락한다면…)
github
https://github.com/jinhyukoo/socket-chatting-room-example
참고자료
- socket.io 공식 홈페이지 : https://socket.io/
Subscribe via RSS
